Organoids are primary patient-derived micro tissues grown within a 3-D extracellular matrix that better represent in vivo physiology and genetic diversity than existing two-dimensional cell lines.
Table of Contents
Introduction
Thawing of Cryopreserved Organoids
Culture and Expansion of Organoids
Cryopreservation of Organoids
Reagents and Solutions
Commentary
Critical Parameters
Troubleshooting
Anticipated Results
Time Considerations
Citations
Resources
Get a PDF of our Organoid Culture Guide
Get GuideInitiation, Expansion, and Cryopreservation of Human Primary Tissue-derived Normal and Diseased Organoids in Embedded Three-dimensional Culture
Introduction
Organoids are primary patient-derived micro tissues grown within a three dimensional extracellular matrix that better represents in vivo physiology and genetic diversity than existing two-dimensional cell lines. Organoids rely on the self-renewal and differentiation of tissue-resident stem cells that expand in culture and self-organize into complex three-dimensional structures. Depending on the tissue, organoids typically lack stromal, vascular, neural, and immune cells but otherwise can contain cells from all the respective tissue-specific cell lineages found in vivo. Established organoids can be initiated from cryopreserved material, cultured using largely traditional cell culture techniques and equipment, and then expanded and cryopreserved for future use. Organoid models have been developed from a variety of diseased and normal tissues including small intestine, colon, mammary, esophagus, lung, prostate, and pancreas.
This article describes protocols for the three-dimensional (3-D) in vitro culture of human primary tissue-derived organoids starting from cryopreserved material. Organoids are self-organizing, self-renewing micro tissues derived from stem cells isolated from normal or diseased samples such as tumor resections or needle biopsies. Organoid technology permits the expansion of cells that would otherwise not proliferate in culture, and simultaneously maintains in vivo-like characteristics such as complex organization, tissue-specific functions, and disease-state phenotypes. Single cells or fragments from primary tissues are suspended in 3-D within an undefined extracellular matrix (ECM) derived from Engelbreth-Holm-Swarm (EHS) murine sarcoma, which takes the form of a gel dome spotted onto standard tissue-culture-treated plastic. Once solidified, these domes are overlaid with a complex medium formulation containing small molecules, recombinant proteins, and other supplements that may be tissue and disease specific.
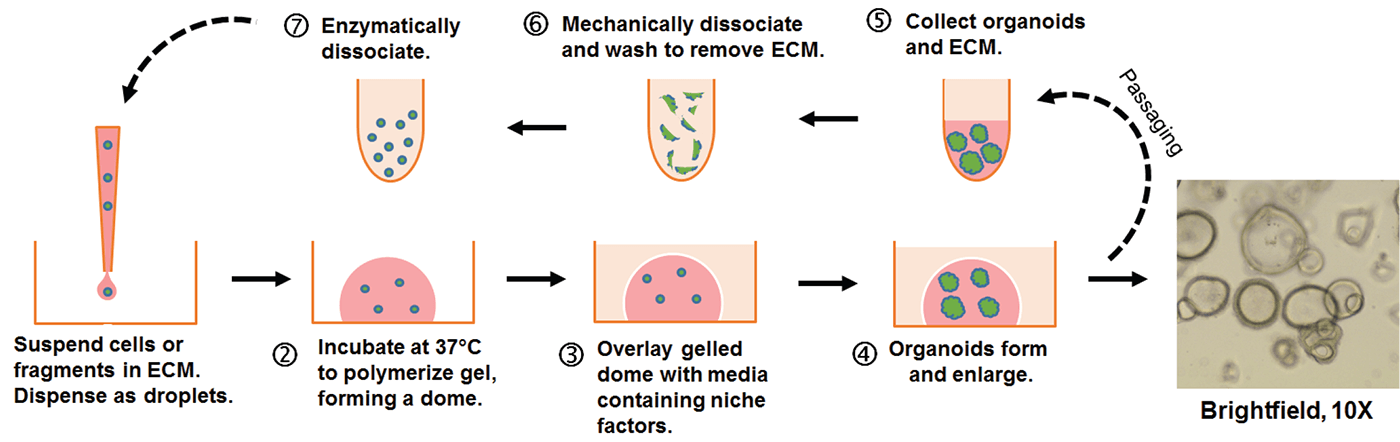
Figure 1: Embedded 3-D “dome” organoid culture workflow. Individual cells or organoid fragments are embedded within a liquid extra-cellular matrix (ECM) and dispensed as small droplets onto the surface of a warm tissue culture plastic vessel. The ECM will solidify into a gel after incubation at 37°C and can then be covered with culture medium. Organoids will develop within the dome as 3-D structures.
Over time in culture, the cells or fragments will expand in number and self-organize into 3-D structures (see Figure 1). Organoids can be propagated and expanded by removal of the ECM followed by enzymatic and/or mechanical dissociation. The dissociated organoids are then returned to 3-D culture conditions to continue expansion and subsequently re-develop into organoids. Organoids are amenable to many standard in vitro assays including RNA and DNA isolation, immunohistochemistry, and genetic manipulation.
This article presents a standardized approach for routine handling of organoids that can be applied to both normal and diseased tissue from various tissue types. The basic steps involved will be familiar to those with experience culturing more traditional two-dimensional cultures of continuous or primary cells. However, organoid culture requires additional considerations and preparation stemming from complex, tissue-specific medium formulations that may not be available commercially, difficulty in counting and manipulating precise cell numbers, the use of multiple undefined components subject to batch-to-batch variation, and a 3-D culture format that utilizes various extracellular matrices with unique handling requirements. Basic Protocol 1 describes the steps to initiate organoid culture from cryopreserved material. Basic Protocol 2 describes maintaining and expanding organoid cultures. Basic Protocol 3 describes how to cryopreserve organoids.
Note that the basic protocols below are written for a hypothetical standard vial of cryopreserved organoids that does not represent any specific model, tissue, or disease. Refer to any model-specific details provided by the source of the model (eg, a biobank) and adjust parameters accordingly. Steps containing potential critical parameters are noted in the protocols below.
Read the entirety of the protocols before proceeding with culture. All protocols should be performed under aseptic culture conditions using sterile supplies, cell culture-grade reagents, and wearing appropriate personal protective equipment. Use good laboratory practices at all times while working in the laboratory. Refer to the Safety Data Sheet (SDS) for all reagents prior to use for important safety information. Refer to the Certificate of Analysis or other documentation accompanying the cryovial of organoids to ensure the material has been verified to be free of contamination. Treat all human-derived material as potentially biohazardous and handle under the appropriate biosafety conditions. Refer to U.S. Public Health Service Guidelines and your institution’s safety office for more information. For additional background information, critical parameters, troubleshooting, and time considerations, please see the commentary at the end of the guide.
Watch our tutorial on thawing, culturing, and cryopreserving human organoids
Thawing of Cryopreserved Organoids
The steps involved in initiating organoid cultures are similar to other cryopreserved cells. Cryovials are removed from liquid nitrogen storage and rapidly thawed. The contents of the vial are washed to remove the cryopreservation medium and generate a cell pellet. The pellet is re-suspended in liquid ECM and dispensed as small droplets onto tissue culture plastic. After a brief incubation at 37°C, the droplets solidify into a gel that can then be overlaid with warm liquid culture medium. Organoids grow and expand within these gel “domes.”
Materials
- Cryopreserved organoids
- Organoid culture medium (see the Critical Parameters section for more information on organoid medium selection and preparation)
- Engelbreth-Holm-Swarm (EHS) murine sarcoma extracellular matrix (ECM; Cell Basement Membrane; ATCC ACS-3035)
- ROCK Inhibitor Y-27632 (optional; see step 19 for details)
- 70% ethanol
- Water bottle preparation (optional; for use in bio-safety cabinet; see recipe)
- Assorted pipettors and tips
- Pipet-aid pipet controller
- Assorted serological pipets
- Water bath at 37°C
- Tabletop centrifuge capable of spinning conical tubes
- Bio-safety cabinet (BSC)
- Humidified, 37°C, 5% CO2 cell culture incubator
- 6-well tissue culture multiwell plates
- 15-ml conical tubes
Preparation
- Prepare medium for the specific organoid model that is being initiated.
Refer to model-specific information to prepare the appropriate culture medium. Alternate medium formulations may exist for the same organoid tissue/type but may alter the model phenotype. If model-specific information is not available, refer to Table 1 for various organoid medium formulations. - Transfer 10 ml basal medium to a 15-ml conical tube and warm to room temperature.
- Per well of organoids to be seeded, warm 2 ml complete medium to room temperature.
This assumes that the cryovial contains 1 × 10⁶ viable cells, sufficient to seed two wells of a 6-well plate. If available, refer to model-specific information on suggested seeding conditions. If seeding into additional wells, warm 2 ml of complete medium per well of a 6-well plate to be seeded. If the contents of the cryovial are unknown, warm 4 ml of complete medium and plan to seed into two wells of a 6-well plate. - Thaw ECM for the specific organoid model that is being cultured. Stock containers or previously prepared aliquots of ECM should be thawed at 4°C. To protect from temperature fluctuations within a refrigerator, keep vials on ice or use a cooling rack. Larger volumes of ECM (>5 ml) should be thawed overnight. Smaller aliquots (<1 ml) will take several hours to thaw on ice.
Refer to model-specific information for the recommended ECM and follow the provided preparation and handling instructions. ECM for some models may require dilution to a specific final concentration. When diluting ECM, use complete organoid medium unless otherwise specified. In the absence of model-specific information, the authors have successfully used Cell Basement Membrane (ATCC ACS-3035), at a final concentration of 10 to 18 mg/ml.
Only thaw the volume required for the procedure. Keep on ice once thawed. Do not re-freeze ECM once thawed. Thawed ECM can be stored for up to 7 days at 4°C. Use diluted ECM immediately and do not store. - Warm culture vessels to be seeded (eg, a 6-well plate) in a 37°C incubator at least 60 min.
Larger vessels may require more time to equilibrate.
Table 1: Example medium formulations for cancer organoids (final concentrations)a
| Component | Basalb | Esophageal | Colon | Pancreatic | Mammary |
|---|---|---|---|---|---|
| Advanced DMEM:F12 | NA | NA | NA | NA | NA |
| HEPES | 1× | 10 mM | 10 mM | 10 mM | 10 mM |
| L-Glutamine | 1× | 1× | 1× | 1× | 1× |
| Noggin | Not included | 100 ng/ml | 100 ng/ml | 100 ng/ml | 100 ng/ml |
| FGF-10 | Not included | 100 ng/ml | Not included | 100 ng/ml | 20 ng/ml |
| FGF-7 | Not included | Not included | Not included | Not included | 5 ng/ml |
| Nicotinamide | Not included | 10 mM | 10 mM | 10 mM | 10 mM |
| N-Acetyl cysteine | Not included | 1 mM | 1 mM | 1.25 mM | 1.25 mM |
| B-27 supplement | Not included | 1× | 1× | 1× | 1× |
| EGF | Not included | 50 ng/ml | 50 ng/ml | 50 ng/ml | 5 ng/ml |
| Heregulin-beta | Not included | Not included | Not included | Not included | 5 nM |
| SB202190 | Not included | 10 μM | 10 μM | Not included | 1.2 μM |
| A83-01 | Not included | 500 nM | 500 nM | 500 nM | 500 nM |
| Gastrin | Not included | Not included | Not included | 10 nM | Not included |
| Y-27632 | Not included | Not included | Not included | Not included | 5 μM |
| Wnt-3A CMc | Not included | 50% | Not included | 50% | Not included |
| R-spondin1 CM | Not included | 20% | 20% | 10% | 10% |
aWe do not recommend including antibiotics when culturing already established organoid models (such as provided by a commercial supplier) as it can mask low-level contamination issues that may be present.
Routinely test your cultures for mycoplasma contamination and ensure all reagents and medium components are tested for sterility.
bBasal medium is not a complete culture medium and should only be used for washing or brief storage of organoids.
cConditioned medium. See Critical Parameters, Conditioned media section for more information.
Thawing
- Remove a vial of cryopreserved organoids from liquid nitrogen storage and immediately thaw vial in a 37°C water bath. Gently swirl vial in the water bath while holding the cap. Do not completely submerge vial.
Follow proper safety precautions when removing vials from liquid nitrogen storage including wearing appropriate personal protective equipment such as a face shield or goggles, insulated gloves, and long-sleeved lab coat. Rarely, cryovials stored in the liquid nitrogen liquid phase can explode when thawed.
A small amount of ice should remain in the vial after thawing. Thawing should typically take 1 to 2 min. Excessive time at ambient temperature or in the water bath will impair organoid viability and recovery. - Decontaminate vial with 70% ethanol (or equivalent) from a spray bottle and transfer to the BSC.
- Using a P1000 pipettor, transfer contents of the thawed vial dropwise to the conical tube containing 10 ml basal medium prepared in step 2.
- Rinse cryovial with an additional 1 ml basal medium and add rinse volume to the conical tube containing the organoids. 10
- Centrifuge suspension to pellet.
Refer to model-specific information and centrifuge at the recommended speed and duration. In the absence of model-specific information, centrifuge at 500 × g for 5 min at room temperature. - Carefully aspirate supernatant and discard without disturbing the organoid pellet. Keep tube at room temperature.
A hazy layer of liquid ECM may be present after centrifugation. If when viewed under an inverted microscope, the ECM layer does not contain significant numbers of organoids, it should be aspirated and discarded. If organoids remain within the ECM layer, additional washing can be performed. Add 10 ml cold basal medium and repeat steps 10 and 11. - Re-suspend pellet in cold liquid ECM. Using a P200 pipettor, pipet up and down 20 to 30 times or until the pellet is completely re-suspended.
If available, refer to the lot-specific information for the number of cells per vial or other seeding instructions. Typically, post-thaw organoids are initiated into a 6-well plate at a density of 2.5 × 10⁵ to 5 × 10⁵ viable cells per well in 100 μl of ECM per well. If the number of cells per vial is unavailable, re-suspend the pellet in 200 μl ECM and seed 100 μl into two wells of a 6-well plate
Do not introduce bubbles into the ECM during pipetting. To prevent premature ECM polymerization, work quickly and do not allow tube and contents to warm.
If seeding cannot begin immediately, place the tube with the ECM organoid suspension on ice. - Remove pre-warmed culture vessel from the incubator and place in the BSC. Work rapidly at this point to ensure the vessel remains warm.
When seeding larger vessels or working with some types of ECM that do not polymerize as easily, place the vessel on top of a warm water bottle within the BSC to maintain temperature longer. See Reagents and Solutions section for instructions on how to prepare. - Using a P200 pipettor, aspirate 100 μl and dispense in the form of 10 to 15 μl droplets of the organoid suspension to a single well of a pre-warmed 6-well multiwell plate. Repeat for each well to be seeded.
Immediately prior to seeding, pipet repeatedly to mix and ensure a homogenous solution. When seeding large volumes of ECM/suspension this mixing should be performed periodically. Do not introduce bubbles. Work rapidly to dispense 8 to 10 droplets per well. Do not allow the droplets to touch each other or the walls of the well. Droplets should form raised domes. - When seeding is complete, immediately cover plate with its lid and carefully invert.
Inverting the culture vessel can facilitate dome formation and minimize organoids sinking through the ECM and making contact with the plastic surface. - Transfer plate (inverted) to a 37°C cell culture incubator. Leave plate undisturbed 15 to 30 min to allow the ECM to polymerize.
- Return plate to BSC and return to the normal orientation.
See the Troubleshooting section if domes do not form. - Carefully add 2 ml room temperature complete medium per well seeded without disturbing the domes.
- Optional: Supplement growth medium with 2 μl (1 μl per ml of complete growth medium) of a 10 mM stock solution of Y-27632 (eg, ATCC ACS-3030).
Refer to model-specific information to determine whether the medium should be supplemented with Y-27632. This small molecule inhibitor of Rho-associated, coiled-coil containing protein kinase (ROCK) is included post thaw for some models and can improve recovery.
In the absence of model-specific information, include Y-27632 at a final concentration of 10 μM in the medium. - Return plate to the incubator for 3 days. Monitor growth by brightfield microscopy.
Organoids are typically visible within 2 to 7 days post thaw. - Perform a medium change by aspirating medium from the wells completely without disturbing the domes and add 2 ml freshly warmed (ambient temperature) complete medium.
Do not supplement the complete medium with additional Y-27632 unless required by the model.
Domes may at times become detached from the plate surface (see Troubleshooting section for potential causes) and if possible, should not be discarded as they typically still contain viable organoids. Avoid aspirating floating domes when changing the medium. - Perform a complete medium change every 2 to 3 days (eg, every Monday, Wednesday, and Friday).
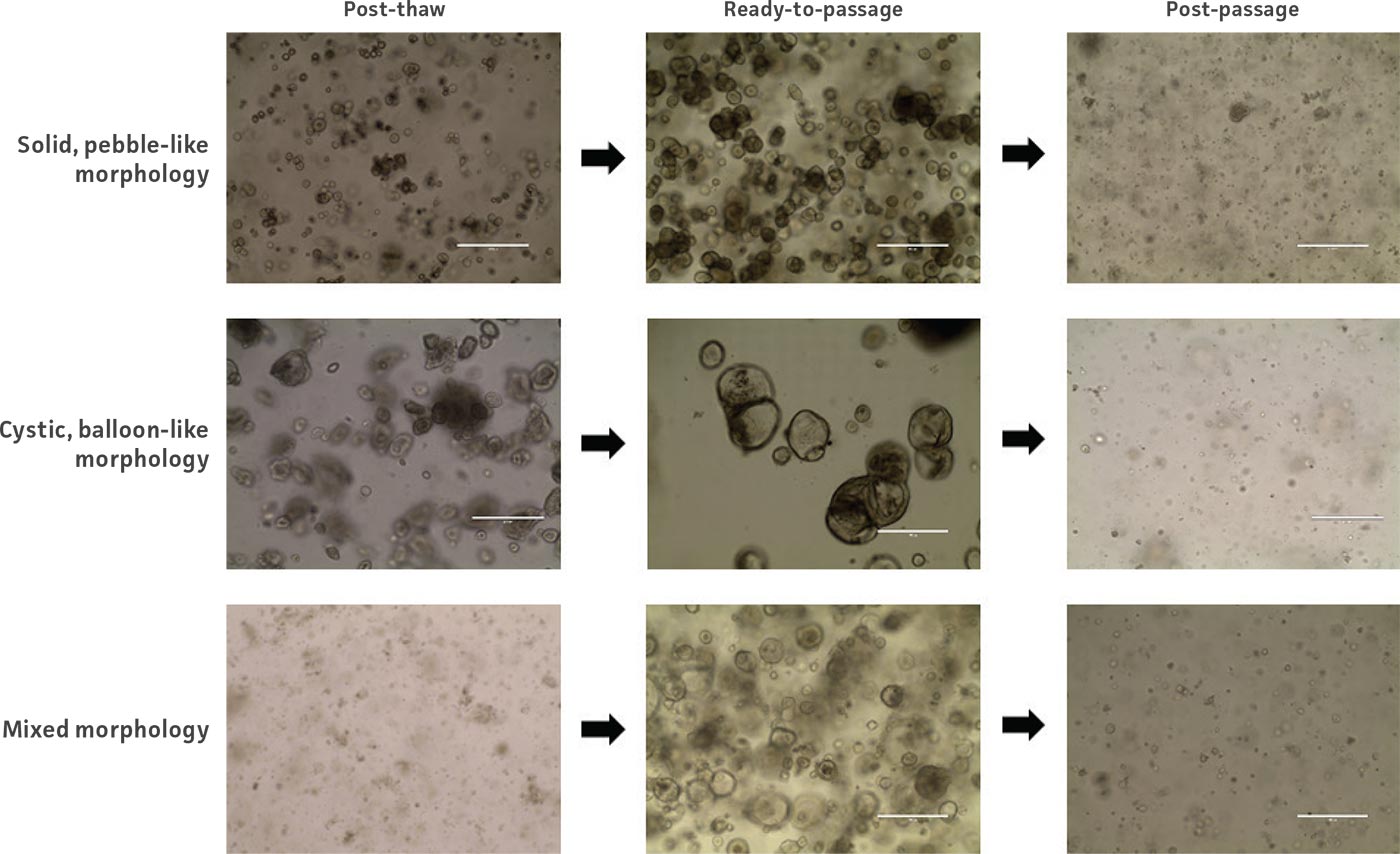
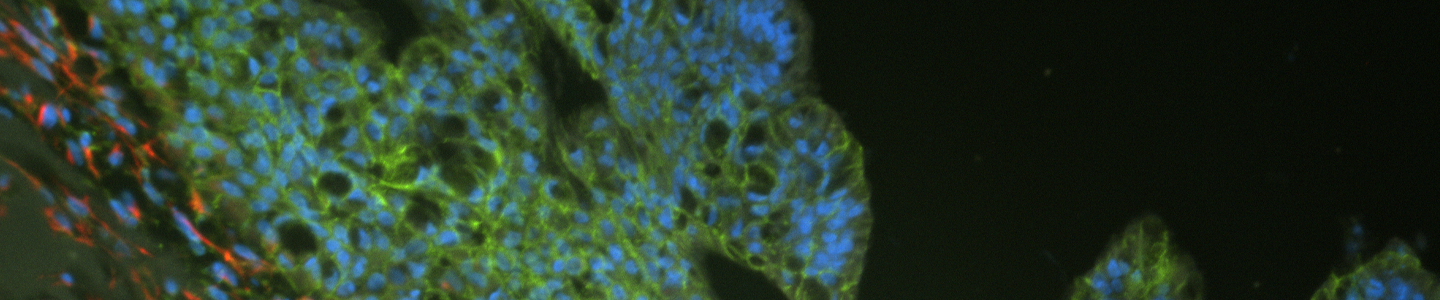
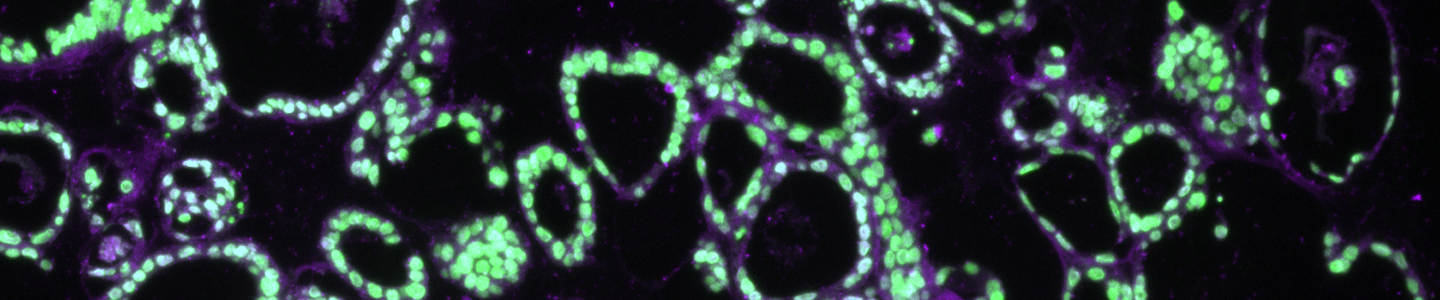
Figure 2: Example images of organoid model morphology during post-thaw, ready-to-passage, and post-passage stages of culture.
Culture and Expansion of Organoids
Organoids are passaged with a combination of mechanical and enzymatic dissociation. Dissociated organoids are washed and re-suspended within fresh ECM. Some organoid models can be dissociated to the single cell level, while others should remain as small multicellular fragments or recovery will be impaired. Some organoid models tend to be “sticky” and will adhere to the inside of pipet tips, serological pipets, and tube walls. Pre-wetting plastics with basal medium will help prevent this sticking, which can reduce yields. Organoids are typically passaged on a consistent regular schedule driven by size (eg, organoids that become large and make contact with one another within the dome) or indicators of differentiation such as the accumulation of debris within the lumen of the organoid. See Figure 2 for example images of organoid model morphology during various stages of culture. Refer to model-specific information for the recommended passaging frequency. Some models may require passaging every 7 days, while others may need 10 to 14 days of growth before passaging. For routine culture maintenance and expansion, 6-well plates or 10-cm2 dishes offer ease of use. In smaller formats, it is significantly more difficult and time consuming to collect and passage organoids, though the overall procedure is the same.
Materials
- Organoid culture medium (see Table 1)
- Engelbreth-Holm-Swarm (EHS) derived extracellular matrix basement membrane (ECM; Cell Basement Membrane; ATCC ACS-3035)
- Dissociation buffer, see model-specific information; if no information is available, use Trypsin-EDTA for Primary Cells (ATCC PCS-999-003) or TrypLE Express (Thermo Fisher Scientific, cat. no. 12604013)
- ROCK Inhibitor Y-27632 (optional; see model-specific information or step 27; eg, ATCC ACS-3030)
- Water bath at 37°C
- Tabletop centrifuge capable of spinning conical tubes (centrifuge with refrigeration capabilities is preferable but not required)
- Bio-safety cabinet (BSC)
- Pipet-aid pipet controller
- Humidified, 37°C, 5% CO2 cell culture incubator
- Assorted pipettors and tips
- Assorted serological pipets
- Assorted culture vessels (eg, 6-well tissue culture multiwell plates, 10-cm2 dishes) 15- and 50-ml conical tubes
- Cell lifters (eg, Corning, cat. no. 3008)
Preparation
- Warm complete medium to room temperature. Keep basal medium at 4°C (on ice).
- Thaw ECM at 4°C and dilute if required (refer to model-specific information). Keep on ice.
- Place desired culture vessels in a 37°C incubator to warm at least 60 min.
ECM removal and washing
The first step in passaging organoids is to remove as much ECM as possible via mechanical breakup of the domes and washing with basal medium. For some types of ECM, keeping the wash medium cold can facilitate a return to a liquid state making the ECM removal easier. The more domes that are processed within a single tube, the more difficult it can be to remove the ECM and more washing steps are typically required.
- Aspirate and discard spent medium from the culture vessel without disturbing the domes. Avoid any floating domes while aspirating the medium.
- Using a cell lifter, scrape attached domes from the surface of the plate to the bottom or corner of the vessel.
Avoid breaking up the domes as much as possible. Transferring intact domes to a tube for washing minimizes organoids sticking to the tissue culture plastic.
Cell lifters are small, single-use, and sterile and are suitable for working in dishes. If cell lifters are not available, small cell scrapers (eg, Corning, cat. no. 3010) or the tip of a P1000 pipet can also be used to scrape the domes off the plate surface. - Add a small volume basal medium (eg, 0.25 ml per well for a 6-well plate and up to 1 ml for a single 10-cm2 dish) to each well containing detached domes to facilitate subsequent transfer.
The addition of a small volume of basal medium makes pipetting the domes easier and prevents them from sticking within the pipet tip. - Using a P1000 pipettor or 5-ml serological pipet pre-wetted with cold basal medium, transfer the “mass” of detached domes plus any medium to an empty conical tube. Refer to Table 2 for recommended tube sizes for a given volume of ECM.
Pre-wet tips and pipets immediately prior to use by pipetting and then dispensing sufficient basal medium to coat in the interior. The small amount of basal medium and pre-wetting the pipet tip with basal medium helps ensure that the domes do not stick to the inside of the pipet tip.
ECM from up to six wells of a single 6-well plate (total ECM volume of 600 to 1200 μl) can be pooled. Larger vessels are generally not pooled but rather handled individually to facilitate ECM removal. The larger the volume of ECM that is pooled the more washing steps may be required to remove the ECM, which can reduce total yield.
Table 2: Volume of dissociation buffer and subsequent dilution buffer
| Vessel | ECM volume | Tube size | Wash volume | Dissociation buffer volume | Dilution volume |
|---|---|---|---|---|---|
| 6-well plate (1 well) | 100-200 μl | 15 ml conical | To 15 ml | 2-3 ml | To 10 ml |
| 6-well plate (2 wells) | 200-400 μl | 15 ml conical | To 15 ml | 4-6 ml | To 10 ml |
| 6-well plate (3 wells) | 300-600 μl | 50 ml conical | To 20 ml | 6-9 ml | To 20 ml |
| 6-well plate (4 wells) | 400-800 μl | 50 ml conical | To 50 ml | 8-10 ml | To 50 ml |
| 6-well plate (5 wells) | 500-1000 μl | 50 ml conical | To 50 ml | 10-11 ml | To 50 ml |
| 6-well plate (entire plate) | 600-1200 μl | 50 ml conical | To 50 ml | 11-15 ml | To 50 ml |
| 10-cm2 dish | 600-1200 μl | 50 ml conical | To 50 ml | 11-15 ml | To 50 ml |
- Using a P1000 pipet tip pre-wetted with cold basal medium, pipet organoid/ECM/medium mixture up and down 20 to 30 times to fully disrupt the domes.
It is critical to sufficiently mechanically disrupt the domes at this step to release the organoids from the ECM. - After mechanical dissociation, fill tube(s) to their maximum volume with cold basal medium.
Washing the organoids with cold basal medium helps liquefy the ECM and facilitate removal in the next steps. - Centrifuge suspension to pellet.
Critical parameter: Refer to model-specific information and centrifuge at the recommended speed and duration. In the absence of model-specific information, centrifuge at 500 × g for 5 min, preferably at 4°C. - Carefully aspirate supernatant and discard without disturbing the organoid pellet.
A hazy layer of liquid ECM may be present after centrifugation. As long as the ECM does not contain organoids, it should be aspirated and discarded.
If organoids remain within the ECM layer additional washing can be performed. Repeat steps 9 to 11.
Organoid dissociation and washing
Following ECM removal, organoids are dissociated into single cells or fragments. Some models may only require mechanical disruption, while others may only require enzymatic dissociation. Some models may require both methods. Ease of dissociation can vary significantly between models. Refer to model-specific information for dissociation conditions and start at step 12, 13, or 14 depending on the recommended dissociation method.
- Mechanical disruption only: Re-suspend pellet in 1 to 2 ml basal medium with a P1000 pipettor. Pipet up and down 20 to 30 times while pressing the tip against the bottom of the tube to break up the organoids into smaller fragments. While the suspension remains in the conical tube, monitor disruption with an inverted microscope and continue dissociation until the organoids have been reduced to fragments. Proceed to step 18.
See the Troubleshooting section for tips if mechanical disruption of organoids proves difficult. - Mechanical disruption and enzymatic dissociation: Re-suspend pellet in 1 to 2 ml room temperature dissociation buffer with a P1000 pipettor. Pipet up and down 20 to 30 times while gently pressing the tip against the bottom of the tube at a slight angle to break up the organoids into smaller fragments. While the suspension remains in the conical tube, monitor disruption with an inverted microscope and continue mechanical disruption until the organoids have been reduced to fragments. Proceed to the enzymatic dissociation in step 14.
Refer to model-specific information for the recommended dissociation buffer. In the absence of model-specific information, we recommend Trypsin-EDTA for Primary Cells or TrypLE Express. - Enzymatic dissociation: Add the volume of room temperature dissociation buffer recommended in Table 2 to the organoid pellet and re-suspend by briefly vortexing at maximum speed. Place tube in a 37°C water bath for 3 to 15 min, vortexing periodically.
Large volumes of dissociation buffer (10 ml or more) may take 10 min or more to reach the temperature of the water bath. Pre-warming the required volume of dissociation buffer for 5 to 10 min in a 37°C water bath immediately prior to re-suspending with organoids can facilitate more rapid dissociation. - Monitor disruption with an inverted microscope every 2 to 3 min and stop when the suspension has reached the desired level of dissociation (i.e., single cells or small fragments).
Some models should not be disrupted down to single cells or their organoid formation capacity will be impaired. Refer to model-specific information, if available. Otherwise, do not fully dissociate down to single cells without first experimentally determining that the model will recover. - Optional: An aliquot from the suspension can be taken for counting. If not fully dissociated, incubate with dissociation buffer at 37°C with periodic vortexing as long as necessary to generate a single cell suspension.
For models that are not fully dissociated during passaging, a single well from a 6-well plate is collected for dissociation to a single cell suspension and counted. This count is used to estimate the cell counts of other plates/vessels growing in parallel.
Extended incubation in the dissociation buffer (>15 min) does not necessarily result in further dissociation, but this is model dependent. - To stop the dissociation, add at least an equal volume of basal medium to dilute the dissociation buffer, and up to the maximum volume of the tube. Refer to Table 2 for recommended volumes.
- Centrifuge suspension to pellet.
Refer to model-specific information and centrifuge at the recommended speed and duration. In the absence of model-specific information, centrifuge at 500 × g for 5 min, preferably at 4°C. - Carefully aspirate and discard supernatant without disturbing the pellet.
Table 3: Suggested volume of ECM used for various vessel sizes
| Vessel | Surface area (cm2) | Total ECM volumea | Number of domes |
|---|---|---|---|
| 48-well plate (1 well) | 0.95 | 10 μl | 1 |
| 24-well plate (1 well) | 1.9 | 20 μl | 1-2 |
| 12-well plate (1 well) | 3.8 | 40 μl | 3-4 |
| 6-well plate (1 well) | 9.5 | 100 μl | 8-10 |
| 6-well plate (entire plate) | 57 | 600 μl | 48-60 |
| 10-cm2 dish | 55 | 600 μl | 48-60 |
aECM should be dispensed as small 10 μl droplets.
Seeding organoids
After dissociation, single cells or multicellular fragments are re-suspended in fresh ECM and dispensed back into culture vessels as 3-D domes. Speed and temperature are critical parameters that must be accounted for during the handling of organoids and ECM. Seeding multiple small culture vessels is typically easier than seeding larger vessels.
All pipets and tips should be pre-wetted with basal medium to minimize organoids sticking to the interior.
- At this step, dissociated organoids from multiple tubes can be pooled, if necessary. Re-suspend pellets in a small volume of basal medium, combine in a single tube, and repeat steps 18 and 19.
- Re-suspend cell pellet in ECM at the desired volume. Refer to Table 3 for typical ECM volumes. With a P1000 pipettor, pipet up and down 20 to 30 times to mix or until completely re-suspended. Do not introduce bubbles.
Refer to model-specific information for suggested seeding densities or split ratios. In the absence of model-specific information, perform a 1:4 split or if a count was performed, re-suspend at 5 × 10⁵ viable cells per 100 μl of ECM. For example, if passaging a single well of a 6-well plate where the count is unknown, re-suspend the pellet in 400 μl ECM and seed four wells of a new 6-well plate at 100 μl per well.
Work rapidly and keep the ECM cold to prevent premature polymerization and occasionally mix by pipetting to ensure a homogenous suspension. - Remove culture vessel from the incubator and place in the BSC.
Work rapidly at this point to ensure the culture vessel remains warm, which will promote dome formation. If necessary, the vessel can be placed on top of a water bottle in the BSC consisting of a large flask completely filled with water that has been kept at 37°C to warm. See Reagents and Solutions section for preparation instructions. - Using a P200 pipettor, aspirate and then dispense the proper volume of ECM/organoid suspension in the form of 10 to 15 μl droplets evenly distributed across the culture vessel surface. When seeding 6-well plates, aspirate 100 μl and seed a single well at a time. When seeding larger vessels (eg, 10-cm2 dishes), aspirate 200 μl at a time. Refer to Table 4 for recommended ECM volumes and vessel size.
Immediately prior to seeding, pipet up and down to ensure a homogenous solution. When seeding large volumes of ECM/suspension this mixing should be performed periodically. Do not introduce bubbles. Do not allow the droplets to touch each other or the walls of the well. Work rapidly. Droplets should remain separated and as raised domes.
Table 4: Suggested volume of growth medium for various vessel sizes
| Vessel | Volume |
|---|---|
| 48-well plate (1 well) | 0.25-0.3 ml |
| 24-well plate (1 well) | 0.5-0.75 ml |
| 12-well plate (1 well) | 1-1.5 ml |
| 6-well plate (per well) | 2-2.5 ml |
| 6-well plate (entire plate) | 12-15 ml |
| 10-cm2 dish | 12-15 ml |
- Immediately cover vessel with a lid and carefully invert without disturbing the domes.
Inverting the plate facilitates dome formation and reduces the likelihood that dissociated organoids will sink to the bottom of the dome prior to complete polymerization. - Transfer vessel (while inverted) to a 37°C cell culture incubator. Leave vessel undisturbed 15 to 30 min to allow the ECM to polymerize.
- Return vessel to the BSC and return to the normal orientation.
See the Troubleshooting section if domes do not form. - Carefully add room temperature complete medium without disturbing the domes. Refer to Table 5 for recommended medium volumes for various culture vessels.
Refer to information provided with the model to determine if Y-27632 supplementation is recommended during passaging. In the absence of model-specific information, do not include Y-27632 during passaging. - Return plate to the incubator.
- Maintain cells by performing medium changes every 2 to 3 days and passaging as required (every 7 to 14 days, depending on the model).
Cryopreservation of Organoids
Organoids are typically cryopreserved at the same point in culture that they would otherwise be passaged. Organoids are cryopreserved intact, in fragments, or as dissociated cells. Refer to model-specific information for cryopreservation conditions. Because generating a single cell suspension to obtain accurate cell counts is incompatible with cryopreservation of intact or partially dissociated organoids, individual wells of a 6-well plate of organoids can be collected, dissociated, and counted to predict the cell number contained in larger vessels cultured in parallel. Alternatively, in the absence of a cell count, cryopreserve one to two wells of a 6-well plate per vial in 500 μl of freezing medium.
Materials
- Freezing medium, see model-specific instructions or if unavailable, use Stem Cell Freezing media (ATCC ACS-3020) or Recovery Cell Freezing Medium and (Thermo Fisher Scientific, cat. no. 12648010)
- Assorted pipettors and tips
- Assorted serological pipets
- 15- and 50-ml conical tubes
- Tabletop centrifuge capable of spinning conical tubes
- Bio-safety cabinet (BSC)
- Pipet-aid pipet controller
- Cryovials
- –80°C freezer
- Cell lifters (eg, Corning, cat. no. 3008)
- Cryopreservation apparatus, eg, CoolCell LX (ATCC ACS-6000) cryopreservation container
Preparation
- Optional: From Basic Protocol 2, perform steps 4 to 11 and 13 to 16 on organoids from one to three wells of a 6-well plate.
This material is sacrificed for counting and used to estimate the cell count of organoids grown in parallel in larger vessel sizes (eg, 10-cm2 dishes).
When collecting and counting from multiple wells, keep organoids separate and then average the counts to determine the organoid cell count per 6-well equivalent.
For example, if the individual total viable cell counts from three wells (100 μl ECM each) of a 6-well plate are 1.0 × 10⁶, 1.5 × 10⁶, and 0.75 × 10⁶ then the estimated viable cells in a 10-cm2 dish (600 μl ECM) is 6.5 × 10⁶.
If the cell count is significantly lower than desired, the organoids should be passaged and expanded as described above in Basic Protocol 2. Alternatively, if the cell count is only slightly lower than desired, and passaging is not otherwise required (no noticeable accumulation of debris within the lumen or other signs of differentiation), the organoids can be cultured for an additional 1 to 2 days and re-counted. - Thaw 0.5 ml freezing medium per vial of organoids to be cryopreserved and keep on ice.
Refer to model-specific instructions for suggested freezing medium. In the absence of model-specific information, the authors have successfully used Stem Cell FreezingMedia (ATCC) and Recovery Cell Freezing Medium (Thermo Fisher Scientific). - Place basal medium on ice.
A volume sufficient to perform a standard passaging will be required. - Label desired number of cryovials and place in BSC.
Cryopreserve remaining material
- In Basic Protocol 2, follow steps 4 to 11 to collect organoids from the domes and remove ECM.
Only perform the enzymatic dissociation step if the model is known to be recoverable from single cells. If required, continue until step 17 in Basic Protocol 2. - If harvesting from multiple individual vessels, pool pellets from multiple wash tubes into a single conical tube and pellet according to the model-recommended centrifugation conditions. In the absence of model-specific information, centrifuge at 500 × g, 5 min, preferably at 4°C.
- Re-suspend pellet in 0.5 ml freezing medium per 2 × 10⁶ viable cells (based on the estimated cell count calculated above) or per 100 to 200 μl collected domes (i.e., one to two wells from a 6-well plate).
- Transfer 0.5 ml to each labeled cryovial with a 10-ml serological pipet. Periodically pipet organoid/freezing medium suspension up and down to ensure a homogenous suspension.
If necessary, pre-wet the serological pipet with freezing medium to prevent cells from sticking. - Place vials in a cryopreservation apparatus and follow the manufacturer’s instructions.
For optimal recovery, organoids should be cryopreserved at a rate of 1°C/min using a controlled rate freezer or freezing containers such as an alcohol-free CoolCell LX (ATCC) cryopreservation container. - Transfer vials to liquid nitrogen vapor phase for long-term storage.
Follow proper precautions when transferring vials to liquid nitrogen storage.

Reagents and Solutions
Water bottle preparation
A large flask filled with water can be heated to 37°C within a cell culture incubator and then used to provide a warm surface when seeding organoids. The multiwell plate or dish can be placed on top of the water bottle within the bio-safety cabinet while working.
- Place a T225 flask vertically inside a bio-safety cabinet.
- Remove the cap and fill completely with sterile water (1 liter).
- Tighten closure on flask. Use a plug style cap if possible.
- Tightly wrap Parafilm around the neck and cap.
- Tilt the flask horizontally. No air bubbles should be present.
- Transfer to a 37°C incubator. The water bottle can either be stored in the incubator permanently, or placed inside 6 hr prior to use.
Commentary
Background Information
The term organoid has been historically used to encompass a variety of 3-D “organotypic” culture approaches, but is now used more specifically to describe a culture approach that utilizes stem cells from adult primary tissue, induced pluripotent stem cells (iPSCs) or embryonic stem cells (ESCs) that are grown embedded within an extracellular matrix (ECM) and self-organize into a complex micro tissue with defined architecture that exhibits in vivo tissue-like characteristics and functions (Shamir & Ewald, 2014).
The first demonstration of this culture system, published in 2009 (Sato et al.), utilized media containing stem cell niche regulating factors (Wnt-3A, noggin, R-spondin1, and epidermal growth factor) and 3-D culture to generate organoids from mouse small intestine (Sato et al., 2011). These “minigut” organoids exhibited distinct intestine-like crypt and villus structures and expressed the full complement of intestinal epithelium-specific cell types, including enterocytes and mucin secreting goblet cells. This system was later adapted to generate organoids from human small intestine and then other tissues including colon, esophagus, stomach, pancreas, and liver (Bartfeld et al., 2015; Gao et al., 2014; Huch et al., 2015; Sato et al., 2011).
Organoid culture is not without limitations. The lack of complete reconstitution of the cellular niche provided by neural, immune, and stromal cells limits physiological relevance. Similarly, the absence of vascularization fundamentally restricts organoid growth potential in vitro. Additionally, the need for an undefined, mouse-derived ECM introduces concerns regarding lot-lot variation and precludes xeno-free culture. Further, the solidified gel ECM also may affect drug and compound penetration and availability to the organoids. Finally, organoids are inherently heterogeneous, which while more representative of in vivo tissue than traditional homogenous cell lines, in culture, the range of organoid sizes and morphologies can make phenotypic screening difficult.
Despite these limitations, organoids are being utilized as models for pre-clinical compound screening, studying organ and tissue development, and for understanding disease (Bartfeld et al., 2015; Chio et al., 2016; Dekkers et al., 2013; Huang et al., 2015; Sato et al., 2011; van de Wetering et al., 2015; Verissimo et al., 2016; Vlachogiannis et al., 2018). Approaches to overcome some of the current limitations of the technology include organoid co-culture with stromal or immune cells, more defined ECMs that remove the need for mouse-derived material, and advanced imaging and analysis methods that better support phenotypic screens.
Table 5: Commercially available conditioned medium generating cell lines
| Vendor | Cell line name | Secreted factors | Catalog number |
|---|---|---|---|
| ATCC | L-WRN | Wnt-3A, R-spondin3, noggin | CRL-3276 |
| ATCC | L Wnt-3A | Wnt-3A | CRL-2647 |
| EMD Millipore | R-Spondin1 expressing 293T Cell Line | R-spondin1 | SCC111 |
| Trevigen | HA-R-Spondin1-Fc 293T | R-spondin1 | 3710-001-01 |
Critical Parameters
Selection of extracellular matrix (ECM)
The ECM is a critical component of the organoid culture system. Most published organoid culture protocols utilize an undefined ECM derived from Engelbreth-Holm-Swarm (EHS) murine sarcoma of which several are commercially available. Defined ECMs, both biological and synthetic, are also available but have not been extensively validated with organoid culture. Individual ECMs have unique properties and are not considered equivalent for culture purposes. Further, lot-lot variations in undefined ECMs may impact culture performance. For consistent culture performance, organoids should be maintained in model recommended ECMs and individual lots of undefined ECM should be pre-tested to ensure they support growth. When switching ECMs, experimentally determine that the organoid models grow as expected and that the desired phenotype/genotype is maintained.
Media selection and preparation
Due to the lack of commercially available options, media for most human organoid types must be prepared from scratch. Organoid medium is relatively complex, requiring approximately ten to twelve components, not including conditioned medium. These components include a variety of supplements, small molecules, and growth factors, which must be sourced from multiple vendors and carefully prepared and stored.
Organoid medium is not standardized and laboratories developing organoid models have generated their own “homebrew” formulations based on what was successful in their hands. The result is that multiple different formulations have been utilized and published for the same type of organoid model. While multiple medium formulations may support growth of the same model, its phenotype and/or genotype may be altered when changing media.
See Table 1 for a selection of examples of medium formulations for mammary, colon, prostate, and esophageal organoids.
Conditioned media
Conditioned medium (CM) from one or more continuous cell lines is a common component of many organoid media formulations. CM may make up as much as 70% of the final complete medium used to grow organoids. CM is collected from specific cell lines that have been engineered to express and secrete into the cell culture supernatant critical factors that support organoid culture (see Table 5 for a non-exhaustive list). These factors frequently include Wnt-3A, R-spondin1, and noggin. CM is utilized primarily for two reasons. First, it can be significantly less expensive than purchasing large quantities of purified recombinant versions of those proteins from commercial sources. Second, CM may exhibit more biological activity in culture than the purified recombinant versions of the same proteins. However, the need to generate CM to supplement organoid culture medium necessitates acquiring and culturing the respective cell lines. Different lines may require different protocols for generating CM. See below for a protocol using L Wnt-3A (ATCC CRL-2647) to generate Wnt-3A CM. A protocol for the generation of R-Spondin 1 CM can be found online.
Protocol for the generation of Wnt-3A conditioned media from Wnt-3a expressing L-cells.
- Split the cells 1:10 in 10 mL culture medium (without G418 if conditioned medium is to be used with a cell line sensitive to G418) in 10 cm2 tissue culture dishes or T-75 flasks and let the cells grow for 4 days (approximately to confluency).
- Take off the medium and sterile filter. This is the first batch of medium.
- Add 10 mL fresh culture medium and culture for another 3 days.
- Take off the medium and sterile filter. This is the second batch of medium. Discard the cells, because they will be overgrown.
- Mix the first batch and second batch of medium 1:1. This is the Wnt-3A conditioned medium. It is stable at 4°C and can be frozen.
Table 6: Table of common problems that can occur during three dimensional primary tissue-derived organoid culture
| Issue | Potential causes and solutions |
|---|---|
| Organoids adhere to the inside of pipet tips and serological pipets | Some models are particularly “sticky” and it is critical to pre-wet the inside of pipet tips and serological pipets with basal medium to reduce their ability to adhere. Use a new tip and rinse before every use when working with sticky organoids. If this is not sufficient to prevent sticking, prepare a 0.5-1% BSA in DMEM:F12 solution and sterile filter (0.2 μm) and use for pre-wetting. |
| Post-thaw organoids do not appear or the culture morphology appears poor |
Wait at least 1 week post thaw to assess recovery. Organoids can be slow to recover from cryopreservation. Verify that 10 μM Y-27632 was included in medium for the first 1-3 days post thaw (if specified in the model-specific information). Refer to product insert and verify that the Y-27632 was prepared and stored properly prior to use. Omission of Y-27632 can significantly reduce post-thaw recovery. Verify that organoids were thawed properly according to the protocol. Excessive time in the water bath or incorrect centrifugation conditions can reduce post-thaw recovery. Verify that the correct medium formulation was used and that it was prepared and stored correctly. Verify that the correct ECM was used and that it was prepared and stored correctly. |
| Organoids fail to recover post passage | Organoids may lose their proliferative capacity and ability to form organoids without an immediate impact on their viability or morphology. If culture appears otherwise normal, but organoids do not re-form after passaging or their morphology changes significantly post passage, the culture should be discarded and fresh medium should be prepared, and the culture restarted from a new vial. If freshly prepared medium does not support cultures, one of the individual medium components may have lost activity or expired. |
| ECM droplets do not form domes (spread out across the well) |
Refer to the lot-specific ECM protein content to ensure it falls within the acceptable range for the model you are growing (if known). Verify that you have correctly diluted (if required) ECM to the appropriate final protein concentration and thoroughly mixed it by pipetting. The recommended minimum protein concentration is 10-12 mg/ml. Ensure culture vessel you are seeding into has been sufficiently pre-warmed in an incubator and remains warm during seeding. Utilize a warm water bottle (see Reagents and Solutions section) to help maintain temperature. This can be particularly important when seeding larger vessels. ECM that is excessively cold may affect dome formation. Remove ECM/organoid suspension from ice briefly prior to seeding. |
| Organoids sink and adhere to plastic | Work rapidly when seeding as the organoids will sink over time until the domes have polymerized. Invert culture vessel immediately after seeding and return to a 37°C incubator to minimize sinking. |
| Domes have unequal numbers of organoids or some domes have no organoids at all | Work rapidly when seeding as the cells in suspension will sink over time within the tube of ECM/organoids. Periodically pipet to mix and ensure a homogenous suspension during seeding. |
| Organoids do not fully dissociate or are difficult to dissociate |
Refer to the model-specific information for guidance on dissociation conditions. Typically, it is sufficient that >70% of organoids are dissociated. Often even with extended dissociation (incubation with dissociation enzyme) times it is difficult to achieve 100% dissociation into single cells. Trituration through a syringe or glass pipet may facilitate increased dissociation but generally is not necessary for routine culture maintenance for many models. When performing mechanical dissociation, rather than using basal medium, re-suspend the pellet in a non-enzymatic, EDTA-based dissociation buffer such as Non-Enzymatic Cell Dissociation Solution (ATCC 30-2103) to facilitate dissociation. |
| White, stringy, or fluffy material is visible during or after dissociation | The act of dissociation may release DNA that is difficult to break up. If this occurs, during dissociation supplement buffer with DNAse I (200 U/ml) and mix thoroughly. |
| ECM becomes thick, cannot pipet |
ECM will polymerize and form a gel if the temperature rises sufficiently. Keep ECM on ice until immediately prior to use and work quickly. If working with large volumes, return tube periodically to ice to cool. Mix again by pipetting prior to use. Pre-chilling tubes and pipet tips can help maintain the temperature of the ECM, but typically is not necessary. |
| Organoid morphology changes during culture |
Under routine culture conditions, morphology should remain consistent. Alterations in culture morphology may reflect a problem with culture conditions. ECM: Ensure the correct ECM is being used for that particular model and it has been diluted to the correct final concentration (if necessary). Medium: Ensure medium is formulated properly and has been stored correctly. Ensure medium changes are occurring at the correct frequency with the correct volume. Culture density: Keep organoid density consistent across multiple passages and when expanding to larger vessels. Passaging frequency: Maintain organoids on a consistent passaging schedule. Some models may start to differentiate after extended time in culture without dissociation and that may permanently impact the culture going forward. |
| Viability is low |
Viability as assessed by trypan blue exclusion can be difficult with organoids due to the presence of cell debris, ECM, and organoid fragments. Refer to model-specific information, if available, to understand the expected viability of the culture. Healthy cultures will usually exhibit viabilities of 70%-90%. Apparent viability may be low immediately post thaw and during the first passage post thaw. Viability will often increase over time in culture as debris and non-proliferating dead cells are washed out during passaging and as the density of viable organoids increases. |
| Slow growth |
Organoid models vary significantly in their growth rates. For example, some models may support 1:6 splits every 7 days while others may require 1:2 splits every 10 days. Refer to model-specific information, if available, to understand the expected growth rate. If the growth rate appears to slow during the course of culture (over multiple passages) try making fresh complete growth medium and/or conditioned medium. |
| Organoid models from the same tissue exhibit different morphologies | This is normal. Morphology is not necessarily tissue dependent and tends to primarily reflect donor/disease characteristics. If available, refer to culture images from the model provider so you know the expected morphology. |
| Domes detach from surface or have holes/appear damaged |
Temperature is critical to ECM polymerization. Ensure that the culture vessel has been pre-warmed and that the ECM is not too cold. It may be helpful to remove the ECM/organoid suspension from ice for 30 sec to warm slightly prior to seeding. Ensure that the ECM has been handled properly and was not exposed to multiple freeze/thaws and was correctly diluted (if necessary). When seeding domes, avoid introducing bubbles. Ensure the culture vessel was pre-warmed in a 37°C cell culture incubator for at least an hour. When seeding large vessels utilize a warm water bottle to keep the culture vessel warm (see Reagents and Solutions section for preparation instructions). Reduce the density of organoids within the domes by seeding less or passaging sooner. Not all ECMs are equally stable in culture. Domes do not maintain their integrity beyond 7-14 days in culture. Rough handling of culture vessels can promote dome detachment. Do not dispense medium directly onto domes during medium changes. |
Scale up limitations of the embedded 3-D culture system
This article describes the currently widely adopted approach of culturing organoids embedded within small domes of ECM dispensed as droplets within standard tissue culture treated plates and dishes. This method is inherently limited in scale up as manual dispensing of droplets into typical flasks, let alone multilayer vessels, is extremely difficult. For routine culture and expansion, 10-cm2 dishes represent a fair tradeoff for sufficient yield and convenience versus larger sizes or alternate formats that occupy significantly more incubator space or are more difficult to handle.

Troubleshooting
Many of the defining aspects of organoid culture such as growth in 3-D, complex media formulations, the use of undefined ECMs, and multiple types of conditioned media, are also potential sources of difficulty and variability that can impact organoid culture stability and reproducibility. The unique handling aspects of the ECM due to its temperature sensitivity may require hands-on practice to perfect the timing when working with it during passaging and seeding. The most likely cause of an organoid culture failing—either immediately post thaw or during routine culture—is incorrectly formulated or expired culture medium. It is critical that all medium components are carefully prepared and stored. For the recombinant proteins and small molecule components, purchase small vial sizes (ideally single use), store according to the manufacturer’s instructions, and do not reconstitute until immediately prior to use. Follow the manufacturer’s instructions when reconstituting recombinant proteins and small molecules. Even when stored correctly, these reconstituted components can lose activity over time while lyophilized stock material can last for multiple years when properly stored. See Table 6 for some common issues that can occur during organoid culture and potential solutions.
Anticipated Results
Some model-to-model variation is expected, but typically, cultures appear initially as individual dissociated cells, fragments of organoids, or intact small organoids, immediately post thaw. Organoids should appear in culture within 3 to 7 days as small ring like or spherical structures with smooth, defined edges. After 7 to 14 days, larger, clearly visible organoids should be apparent. Model to-model morphology can vary significantly, from small and solid pebble-like organoids, to large, cystic balloon-like organoids, but should remain consistent during the course of culture for any particular model when maintained at a consistent density. Organoids are typically ready for passaging every 7 to 10 days when following the protocols above. The accumulation of debris within the lumen resulting in organoids with dark centers is usually a good indicator that organoids require passaging, but this does not occur with all models/tissues. See Figure 2 for examples of various organoid model morphologies immediately after thawing, when ready to passage, and immediately post passage.
Time Considerations
Relative to other common cell culture methods, the initiation and maintenance of 3-D organoid cultures requires some additional hands-on time. In particular, depending on the model, the passaging procedure may be longer than traditional cell lines due to the need to combine enzymatic treatment and mechanical disruption to remove the gelled ECM and further disaggregate the organoids.
The most significant time considerations are preparation related, including the need to make the complex medium from scratch, prewarming culture vessels, the handling of the ECM, and the production of CM. Depending on the specific cell line and protocol, CM production can require a week or more to generate and thus should be generated in advance, as it is a multiday procedure, though the hands-on time is limited (under 2 hr from start to finish).
Prior to initiating organoid culture, the multiple recombinant proteins, small molecules, and peptides required for a particular medium formulation should be reconstituted and aliquoted in single-use volumes. Complete growth medium should be prepared in advance and may take several hours of hands-on time, particularly if components must be first reconstituted and aliquoted. Preparing aliquots of ECM will require at least 2 days as a volume of ECM greater than 1 ml will require overnight thawing at 4°C.
On the morning of organoid seeding or passaging, simultaneously bring the previously prepared complete growth medium to room temperature, place the volume of ECM required on ice to thaw, and pre-warm tissue culture vessels, as these tasks will take 2 to 3 hr. With proper preparation, less than an hour of hands-on time is required for the initial thaw and seeding of a single vial of organoids. The first post-thaw passage (two wells from a 6-well plate) should also take less than an hour. Additional time will be required as the number of culture vessels maintained increases.
Get a PDF of our Organoid Culture Guide
Get Guide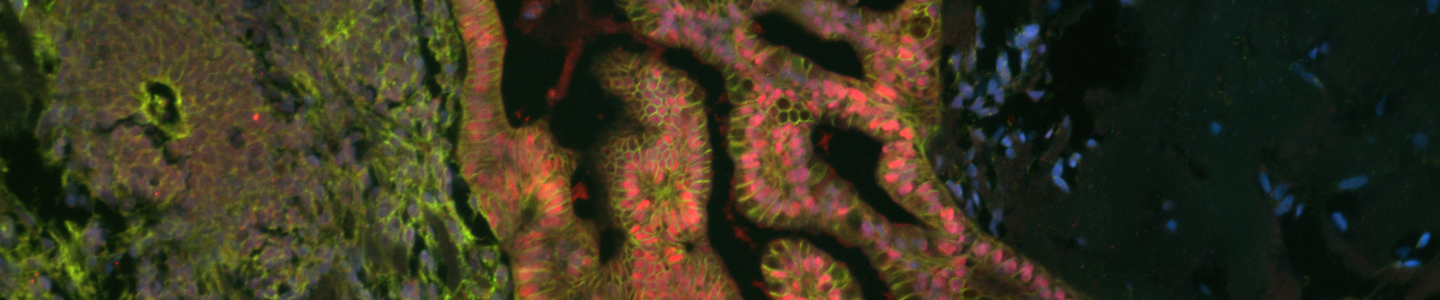
Acknowledgments
These protocols were developed in association with the international Human Cancer Models Initiative (an initiative led by the U.S. National Cancer Institute, Cancer Research U.K., the HUB Foundation, and the Wellcome Sanger Institute) and other partners including Cold Spring Harbor Laboratories, ARC-Net Research Centre, University of Verona, and the Broad Institute.
Thank you to James Clinton and Penney McWilliams-Koeppen for their contributions to this publication.
|
How to cite this article: Clinton, J., & McWilliams-Koeppen, P. (2019). Initiation, expansion, and cryopreservation of human primary tissue-derived normal and diseased organoids in embedded three-dimensional culture. Current Protocols in Cell Biology, 82, e66. doi: 10.1002/cpcb.66 |
Literature Cited
Bartfeld, S., Bayram, T., van de Wetering, M., Huch, M., Begthel, H., Kujala, P., ... Clevers, H. (2015). In vitro expansion of human gastric epithelial stem cells and their responses to bacterial infection. Gastroenterology, 148(1), 126–136. doi: 10.1053/j.gastro.2014.09.042.
Chio, I. I. C., Jafarnejad, S. M., Ponz-Sarvise, M., Park, Y., Rivera, K., Palm, W., ... Wright, K. (2016). NRF2 promotes tumor maintenance by modulating mRNA translation in Current Protocols in Cell Biology pancreatic cancer. Cell, 166(4), 963–976. doi: 10.1016/j.cell.2016.06.056.
Current Protocols. (2001). Laboratory stock solutions and equipment. Current Protocols in Cell Biology, 1, A.2A.1–A.2A.10. doi: 10.1002/0471143030.cba02as00.
Dekkers, J. F., Wiegerinck, C. L., De Jonge, H. R., Bronsveld, I., Janssens, H. M., De Winter-de Groot, K. M., ... Nieuwenhuis, E. E. (2013). A functional CFTR assay using primary cystic fibrosis intestinal organoids. Nature Medicine, 19(7), 939–945. doi: 10.1038/nm.3201.
Gao, D., Vela, I., Sboner, A., Iaquinta, P. J., Karthaus,W. R., Gopalan, A., ... Wongvipat, J. (2014). Organoid cultures derived from patients with advanced prostate cancer. Cell, 159(1), 176–187. doi: 10.1016/j.cell.2014.08.016.
Huang, L., Holtzinger, A., Jagan, I., BeGora, M., Lohse, I., Ngai, N., ... Arrowsmith, C. (2015). Ductal pancreatic cancer modeling and drug screening using human pluripotent stem cell–and patient-derived tumor organoids. Nature Medicine, 21(11), 1364–1371. doi: 10.1038/ nm.3973.
Huch, M., Gehart, H., Van Boxtel, R., Hamer, K., Blokzijl, F., Verstegen, M. M., ... van de Wetering, M. (2015). Long-term culture of genome-stable bipotent stem cells from adult human liver. Cell, 160(1), 299–312. doi: 10.1016/j.cell.2014.11. 050.
Sato, T., Stange, D. E., Ferrante, M., Vries, R. G., Van Es, J. H., Van Den Brink, S., ... Clevers, H. (2011). Long-term expansion of epithelial organoids from human colon, adenoma, adenocarcinoma, and Barrett’s epithelium. Gastroenterology, 141(5), 1762–1772. doi: 10.1053/j. gastro.2011.07.050.
Sato, T., Vries, R. G., Snippert, H. J., van de Wetering, M., Barker, N., Stange, D. E., ... Clevers, H. (2009). Single Lgr5 stem cells build crypt-villus structures in vitro without a mesenchymal niche. Nature, 459(7244), 262–265. doi: 10.1038/nature07935.
Shamir, E. R., & Ewald, A. J. (2014). Three dimensional organotypic culture: Experimental models of mammalian biology and disease. Nature Reviews Molecular Cell Biology, 15(10), 647–664. doi: 10.1038/nrm3873.
van de Wetering, M., Francies, H. E., Francis, J. M., Bounova, G., Iorio, F., Pronk, A., ... McLaren-Douglas, A. (2015). Prospective derivation of a living organoid biobank of colorectal cancer patients. Cell, 161(4), 933–945. doi: 10.1016/j.cell.2015.03.053.
Verissimo, C. S., Overmeer, R. M., Ponsioen, B., Drost, J., Mertens, S., Verlaan-Klink, I., ... Bernards, R. (2016). Targeting mutant RAS in patient-derived colorectal cancer organoids by combinatorial drug screening. Elife, 5, e18489. doi: 10.7554/eLife.18489.
Vlachogiannis, G., Hedayat, S., Vatsiou, A., Jamin, Y., Fern´andez-Mateos, J., Khan, K., ... Rata, M. (2018). Patient-derived organoids model treatment response of metastatic gastrointestinal cancers. Science, 359(6378), 920–926. doi: 10.1126/science.aao2774.